Your suggestion to improve the Kerning feature

@twinbrush we still haven’t published any improvement on that front yet - but as suggested by @Hybi the most practical solution is to duplicate your font and replace all characters with new design, as spacing & kerning values will be preserved.

Still have much work on the background before we can release a more powerful solution, but rest assured that it will come.

2 Likes

No worries at all @franz
I just wasn’t sure as I know im pretty late to the conversation. Sounds good as a work around though :smiley: cheers @Hybi

1 Like

Maybe you set optical measurements from illustrator and it automatically copies the sizes…

1 Like

you can see a similar script made for glyphs at https://github.com/mekkablue/Glyphs-Scripts/blob/master/Metrics/Steal%20kerning%20from%20InDesign.py

1 Like

I have a problem when one glyph in the kerning pair is a space. For example : I have a “j” for which I adjusted the spacing on the left side, so it crawls underneath the character at the left. For certain pairs I additionally adjusted the Kerning, but now I have a problem when the word begins with a “j” because of the space it messes up the kerning. But I can’t have a space as one of the kerning pair. Any ideas?

1 Like

It would be great to copy/paste kerning metrics from case to case or ‘import from upper/lower case’. This is especially helpful for display fonts where there is no lower case set and cases are the same. Right now you have to enter two separate sets of kerning metrics, when the characters are all the same. Would be a huge time saver.

2 Likes

+1 for kerning classes

Designing multilingual fonts without kerning classes is just a huge pain in the neck… I just gave up adding multilingual support to my font because of that.

Also some kind of metrics/spacing classes would be very helpful. Or at least an option to copy/paste spacing values or set spacing for many glyphs at once.

2 Likes

Yea the ability to copy/paste or export/import glyph spacing and kerning metrics would be a massive help and time-saver. Especially when creating multilingual alternates. :metal:t2:

1 Like

Me too so +1 for Kerning classes

1 Like

Hey guys,

As promised, we’re about to release a new BETA with kerning classes. Many things remain improvable but the core feature, kerning classes, is here. This BETA will be availbale next week if there’s no suprise here.

Until there, sneak peeks for you guys :wink:

13

3 Likes

Holy crap this is massive! Do you have an ETA? Will this trickle down to the photoshop version too?

Kick on!

1 Like

Yep! AI & PS.
A first BETA is coming next week :wink:

1 Like

Yes, yes and yes Mohamed.

1 Like

Can’t wait for the group kerning option!

1 Like

Hey everybody,

You should have received an invite to test our new BETA with Kerning Groups :gift:
So please, feel free to give us your feedbacks here :+1:

@itsmesimon @twinbrush @mmnowak86 @harleycreative @Monique @ipassas @impulsenine @AlanP @mikkomix @Jelle @Mehmet @Hybi @Vocal @fvnetu

3 Likes

is there any tutorial for kerning group? still dun know how to group glyph and put value?

thank you

1 Like

Hey @lulu.
We’re going to write a tutorial very soon. Meanwhile, here are some tips that should help you.
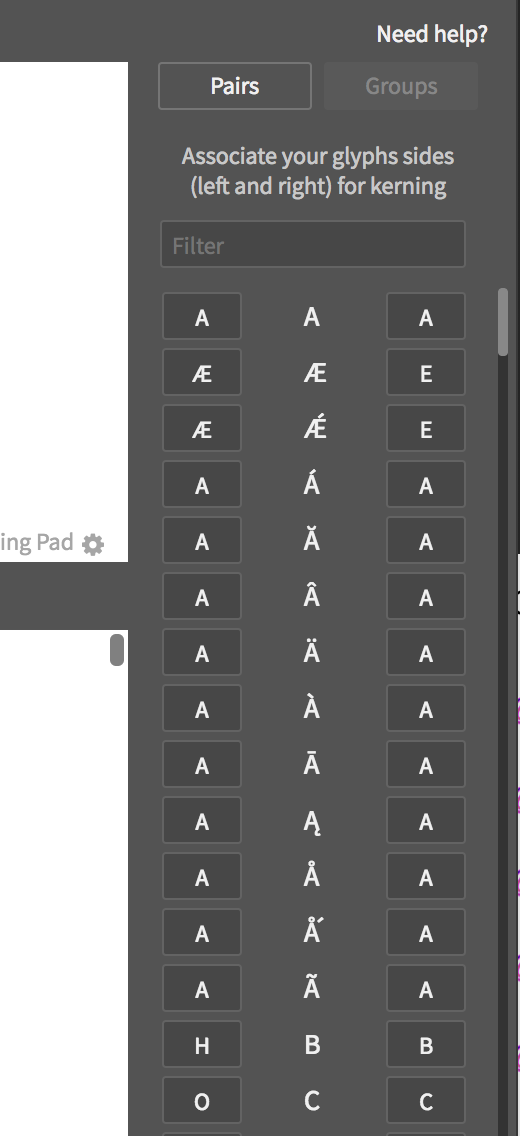
Kerning Table has now 2 tabs, one for Pairs (you already know) and one new for Groups.
51

I recommend to start by grouping you glyphs. And only after that, make your kerning.

Groups:
For each glyph, you can assign a group for its left side and its right side based on its shape. In other words, you can tell Fontself that the left/right side of this glyph is the same for kerning that another letter.
Let’s take an example:
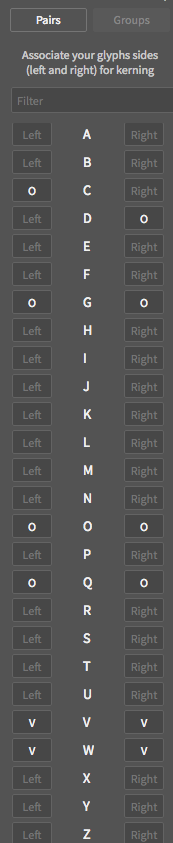
Let’s say you want to group all your glyphs that are “round” on left side (C, O, Q, G). For that you decide which letter gonna be the group master (let choose O) and then you type O on the left cell of all of these letters. Tha’s it!

Then you can do the same thing for the right side. And group W with V:

Once you’re happy with all of your groups, you can start kerning.

Kerning pairs
Like before you can create basic single kerning pairs.
But now, kerning becomes easier and faster as each time you kern a group master (O, V…), all its group members are kerned automatically.

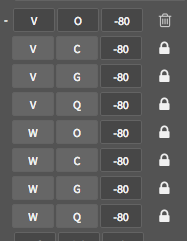
For instance, let’s see what happens when you kern V and O:
29

As you can see, on left side there is a ‘+’ that indicates that multiple siblings pairs have been generated. You can visualize them by clicking on it.

35

All of these sibling pairs are locked and linked to the master pair VO. If you modify the kerning value of one pair, you impact the other pairs.
If you want to modify only one pair (to create what we call a kerning exception), you just have to unlock it by clicking the the locking symbol.

Et voilà!

Kerning sample texts:
13

We also added these buttons that generates sample texts to help you kern faster for uppercase, lowercase, digits and symbols.

That’s all for now. Hope it gonna let you enjoy kerning groups.

1 Like

I updated the PS plugin but don’t see the kerning groups? Have I done something wrong or is the photoshop version behind the illustrator version?

1 Like

@itsmesimon the beta of kerning groups are currently in Illustrator only, but coming soon in PS.

1 Like

the new kerning feature is a greatest thing ever! Maybe you need to think about same feature for spacing :wink:

1 Like